User Guide
Welcome to the ElenPAY User Guide. This guide will help you integrate and use our payment system, covering deposits, withdrawals, webhooks, and best practices for a smooth experience.
API Documentation
You can find the full API reference here: ElenPAY API
Before You Start
Note: Store setup, API authentication, and webhook registration are handled by our operations team. Merchants do not need to configure these themselves. If you need to add a new store, change your store currency, or update webhook endpoints, please contact our support or ops team.
Error Handling
For details on API error responses, error codes, and troubleshooting failed requests, please refer to the API Documentation. The API docs include example error payloads and guidance on interpreting error messages.
Currency Support
Each store is configured to accept either BTC or a single fiat currency (e.g., USD, EUR). If you wish to accept payments in multiple currencies, you must request a separate store for each currency through our ops team. You do not need to provide the team with a different callback url.
Invoice Expiry
- Lightning (Bolt11) invoices expire after 15 minutes by default.
- You can set a custom expiration by including the
checkout.expirationMinutesfield (in minutes) in your invoice creation request (see API docs for details). - Payments cannot be made after expiry; the Lightning Network enforces this restriction.
Staging Environment
- All integration and testing should be performed against our staging environment, referenced as
api-staging.elenpay.techin this guide. - The staging environment mirrors production but is safe for test transactions.
Metadata Field
The metadata field is a JSON object used to store custom information that helps you track and identify transactions in your system. This metadata is included in all webhook notifications for easy correlation with your internal records.
Important Notes:
metadatavalues are limited to alphanumeric characters, dashes, and underscores. They should not contain spaces or special characters.- Some fields might be optional and some required. This may change for different endpoints.
- Every webhook includes the metadata provided during transaction initiation for easy correlation with your internal records.
Fields:
OrderId: Unique order identifier for your systemCustomerId: Unique customer identifier for your systemMerchantId: Your merchant identifier if you use multiple merchant accounts, otherwise your own store ID (optional in most cases).
Example Metadata:
{
  "OrderId": "12345678",
  "CustomerId": "401329b6-dd4e-4b4e-a866-730d4bc116c4",
  "MerchantId": "5GtvTUFXtJGrqGV5kqMbadtKr4aL2Z63Muk2rAQkYzyT"
}
Usage in Webhooks:
For the merchant's convenience, every webhook includes the metadata provided during the initiation of the transaction. This allows you to easily match webhook events to your internal records, such as orders or customer details.
Example: If you provided OrderId, CustomerId, and MerchantId in the metadata when creating an invoice or withdrawal, these fields will be included in the webhook payload.
Lightning Deposits (Receiving Lightning Payments)
With Widget (Recommended)
A deposit is the process of receiving a payment from an end user using the ElenPAY payment widget.
Flow:
- The end user clicks "Checkout with Lightning" on your website.
- Your backend creates an invoice by calling the ElenPAY API.
- ElenPAY returns the invoice details, including a
checkoutLink. - You display the checkout link to the user, which opens the ElenPAY payment widget.
- The user pays through the widget using their preferred Lightning wallet.
- ElenPAY notifies you of the payment status via webhook (settled or expired).
Sequence Diagram:
sequenceDiagram
  EndUser->>Merchant: Click on "Checkout with Lightning"
  Merchant->>ElenPAY: Create invoice
  ElenPAY-->>Merchant: Return invoice details (with checkoutLink)
  Merchant->>EndUser: Show checkout widget
  EndUser-->>ElenPAY: Pay with Lightning wallet
  ElenPAY->>Merchant: Webhook notification (settled, expired)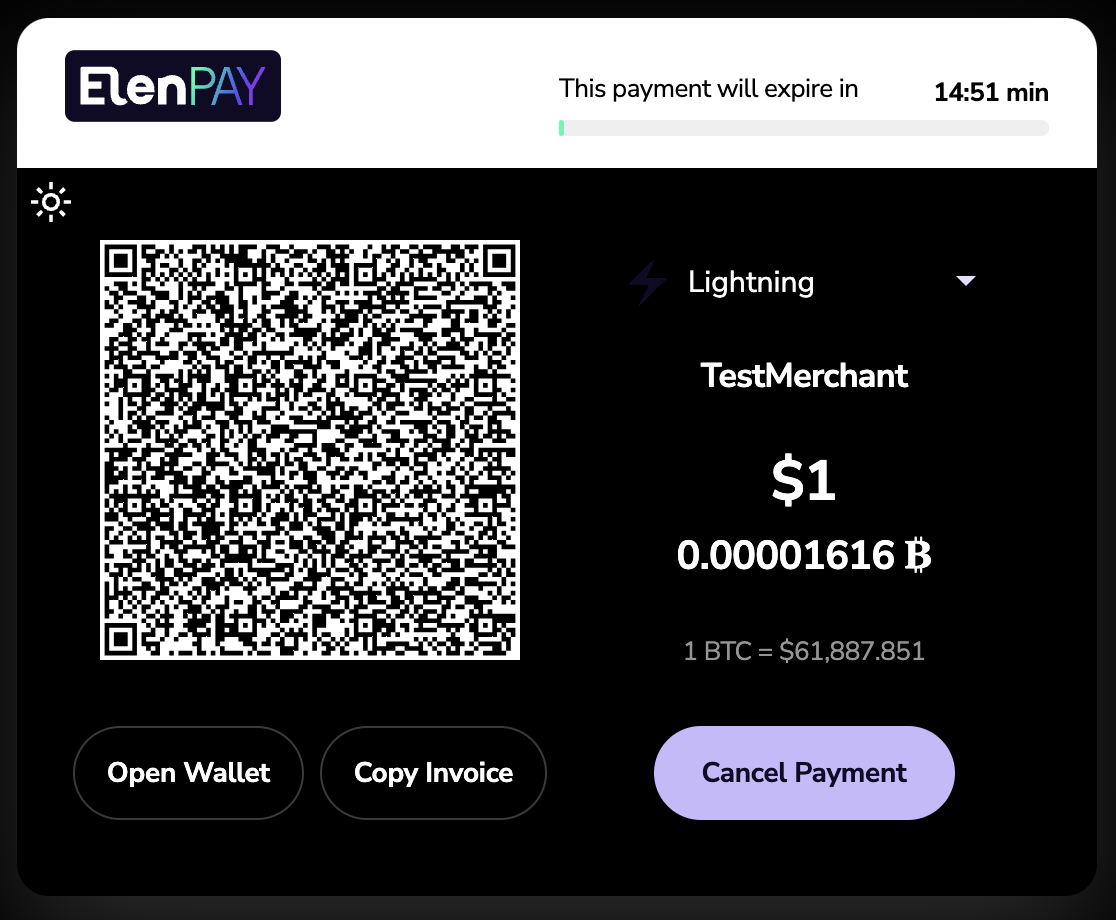
Deposits without amount previously defined
You can also initiate a deposit flow without specifying an amount upfront. In this case, the widget will prompt the user to enter the desired payment amount.
The flow is similar to the standard widget deposit flow, with one key difference: instead of creating a regular invoice, you must create an amountless invoice using the dedicated endpoint.
sequenceDiagram
  EndUser->>Merchant: Click on "Checkout with Lightning"
  Merchant->>ElenPAY: Create payment intent
  ElenPAY-->>Merchant: Return amountless checkout details
  Merchant->>EndUser: Show checkout widget
  EndUser-->>ElenPAY: Enter desired amount
  ElenPAY->>EndUser: Show QR to pay requested amount
  ElenPAY->>Merchant: Webhook notification (settled, expired)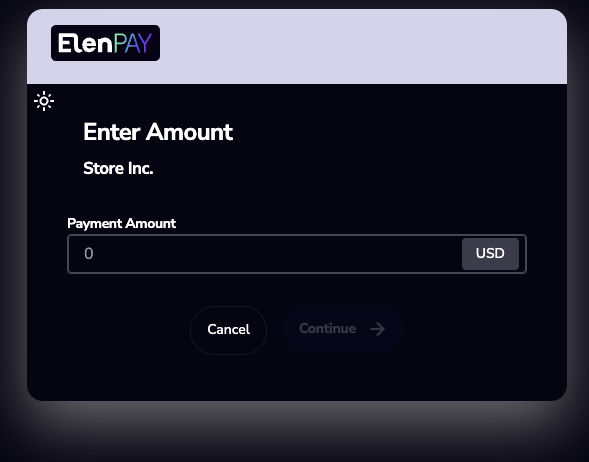
Redirecting to your website
When initiating a deposit, you can configure the redirectURL and redirectAutomatically fields. This will allow the widget to redirect to your website after a deposit is completed:
checkout.redirectURL: Specifies the URL where the customer will be redirected after payment completion. Make sure your url starts withhttps://checkout.redirectAutomatically: If set totrue, the widget will automatically redirect the customer to theredirectURLafter payment completion. Otherwise, we will expose a button that the user can click for going back to your website.
Without Widget (Direct Bolt11)
A deposit can also be processed without the widget, by directly presenting the user with a Bolt11 invoice.
Flow:
- The end user initiates a payment on your site.
- Your backend creates an invoice by calling the ElenPAY API.
- You obtain the Bolt11 invoice from the payment methods endpoint.
- You display the Bolt11 invoice (QR code or string) to the user for payment.
- ElenPAY notifies you of the payment status via webhook (settled or expired).
Sequence Diagram:
sequenceDiagram
  EndUser->>Merchant: Initiate payment
  Merchant->>ElenPAY: Create invoice
  ElenPAY-->>Merchant: Return invoice details
  Merchant->>ElenPAY: Get payment methods (Bolt11)
  Merchant->>EndUser: Show Bolt11 invoice (QR or string)
  EndUser-->>ElenPAY: Pay with Lightning wallet
  ElenPAY->>Merchant: Webhook notification (settled, expired)
Creating an Invoice
Endpoint: POST /api/v1/stores/{storeId}/invoices
Description: Creates a new invoice for a deposit. Use this to request payment from a user via Lightning or the widget.
Required fields:
checkout.paymentMethods:["BTC-LightningNetwork"]currency:BTCor a fiat currency (e.g., USD, EUR). Fiat rates are always based on BTC.amount: Use two decimals for fiat, eight for BTC (e.g.,5.00for USD,0.00100000for BTC).metadata: JSON object with required fields (see Metadata Field section for details):OrderId(optional): Unique order identifier for your systemCustomerId(optional): Unique customer identifier for your systemMerchantId(optional): Your merchant identifier if you use multiple merchant accounts
Example CURL:
export STORE_ID="XXXXXXXXXXXXXX"
export API_TOKEN="XXXXXXXXXXXXX"
export URL="https://api-staging.elenpay.tech"
curl -X POST "${URL}/api/v1/stores/${STORE_ID}/invoices" \
  -H "accept: application/json" \
  -H "Content-Type: application/json" \
  -H "Authorization: Token ${API_TOKEN}" \
  -d '{
    "metadata": {
      "OrderId": "12345678",
      "MerchantId": "5GtvTUFXtJGrqGV5kqMbadtKr4aL2Z63Muk2rAQkYzyT",
      "CustomerId": "401329b6-dd4e-4b4e-a866-730d4bc116c4"
    },
    "checkout": {"paymentMethods": ["BTC-LightningNetwork"]},
    "amount": "5.00",
    "currency": "USD"
  }'
Response:
- The response contains the payment intent
id. Store this in your database for future reference.
Creating an Amountless Invoice
Endpoint: POST /api/v1/stores/{storeId}/amountless-invoices
Description: Creates a new amountless invoice for a deposit. Use this when the payment amount will be entered by the user through the widget.
Note: The currency of the payment is determined by the currency configured for your store.
Required fields:
metadata: JSON object with required fields (see Metadata Field section for details)
Optional fields:
checkout.redirectURL: URL where the customer will be redirected after payment completion (see Redirecting to your website for details)checkout.redirectAutomatically: Iftrue, automatic redirection will be enforced (see Redirecting to your website for details)
Example CURL:
export STORE_ID="XXXXXXXXXXXXXX"
export API_TOKEN="XXXXXXXXXXXXX"
export URL="https://api-staging.elenpay.tech"
curl -X POST "${URL}/api/v1/stores/${STORE_ID}/amountless-invoices" \
  -H "accept: application/json" \
  -H "Content-Type: application/json" \
  -H "Authorization: Token ${API_TOKEN}" \
  -d '{
    "metadata": {
      "OrderId": "12345678",
      "MerchantId": "5GtvTUFXtJGrqGV5kqMbadtKr4aL2Z63Muk2rAQkYzyT",
      "CustomerId": "401329b6-dd4e-4b4e-a866-730d4bc116c4"
    },
    "checkout": {
      "redirectURL": "https://www.google.com",
      "redirectAutomatically": false
    }
  }'
Response:
id: The reference for the payment intent. Store this in your database for future reference.checkoutLink: URL to the checkout page where the user will input the amount to pay.
Fetching status of a payment intent
Endpoint: GET /api/v1/intents/{intentId}
Description: Retrieves the current status and details of a payment intent. Use this endpoint to obtain the payment reference ID for your store and for tracking the payment.
Required fields:
intentId: ID of the intent. You should get it after creating an amountless invoice
Example CURL:
export INTENT_ID="XXXXXXXXXXXXXX"
export API_TOKEN="XXXXXXXXXXXXX"
export URL="https://api-staging.elenpay.tech"
curl -X GET "${URL}/api/v1/intents/${INTENT_ID}" \
  -H "Authorization: Token ${API_TOKEN}" \


**Response:**

- `id`: The payment intent reference.
- `storeId`: Your store reference.
- `pspReferenceId`: Reference of the payment within your store. Use this value to check payment status.
- `checkoutUrl`: The URL the payer uses to complete the payment.
- `redirectURL`: The URL to redirect the payer to after payment completion.
- `redirectAutomatically`: Indicates whether redirection occurs automatically after payment.
- `metadata`: See [Metadata Field](#metadata-field) for details.


### Payment Links

Payment links allow you to direct users to complete payments using either the ElenPAY widget or a direct Lightning invoice. Below are the two options:

#### 1. Checkout Link (Widget)

Use the `checkoutLink` field from the invoice creation response to direct users to the ElenPAY widget. This widget provides a seamless payment experience.

**Example:**

```markdown
https://<ElenPAY_domain>/i/<invoiceId>
2. Lightning Invoice (No Widget)
If you want to use your own widget or make the user pay from your own website, retrieve the Lightning invoice using the payment methods endpoint. The payments[0].destination field in the response contains the Bolt11 invoice, which you can display as a QR code or a clickable link for wallets.
Endpoint: GET /api/v1/stores/{storeId}/invoices/{invoiceId}/payment-methods
Example:
lnbc1...
L1 Deposits (Receiving Bitcoin Top-Ups)
With Widget
A Bitcoin top-up is performed by providing the end user with a Bitcoin address (via the ElenPAY payment widget). The user pays to this address using their Bitcoin wallet. ElenPAY monitors the address for payment and notifies you via webhook when the payment is processed and settled.
Flow:
- The end user clicks "Checkout with Bitcoin" on your website.
- Your backend creates a Bitcoin top-up request by calling the ElenPAY API.
- ElenPAY returns the top-up details, including a
checkoutLink. - You display the checkout link to the user, which opens the ElenPAY payment widget showing the Bitcoin address and QR code.
- The user pays to the provided Bitcoin address using their wallet.
- ElenPAY monitors the address and notifies you of the payment is processed and settled.
Sequence Diagram:
sequenceDiagram
  EndUser->>Merchant: Click on "Checkout with Bitcoin"
  Merchant->>ElenPAY: Create Bitcoin top-up request
  ElenPAY-->>Merchant: Return top-up details (with checkoutLink)
  Merchant->>EndUser: Show checkout widget (Bitcoin address/QR)
  EndUser-->>ElenPAY: Pay to Bitcoin address
  ElenPAY->>Merchant: Webhook notification (confirmations, settled)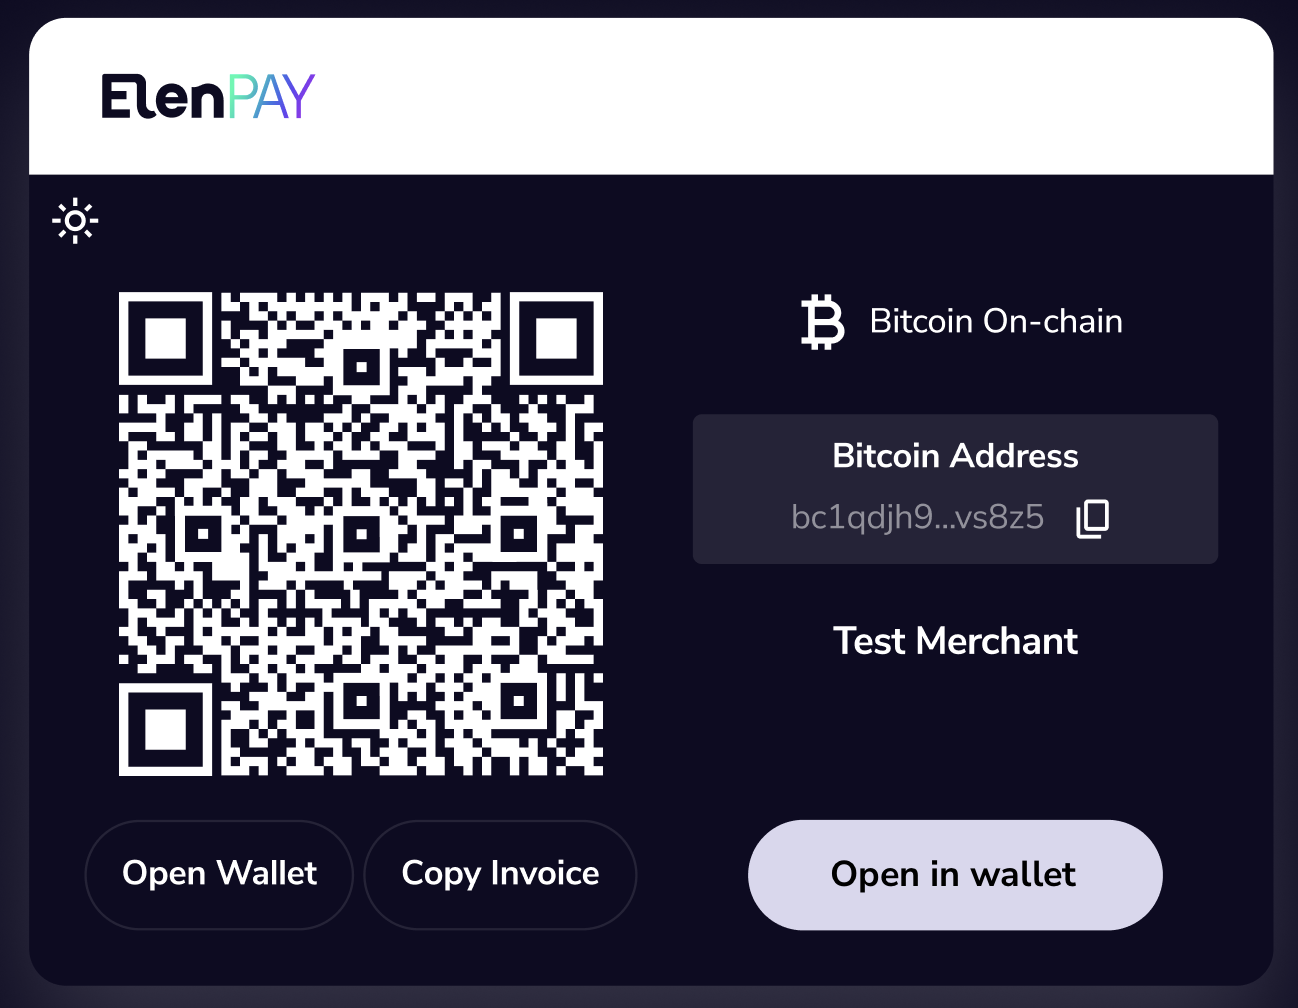
Without Widget
A Bitcoin top-up can also be performed by directly presenting the user with a Bitcoin address (without the widget). The user pays to this address using their Bitcoin wallet. ElenPAY monitors the address and notifies you via webhook when the payment is processed and settled.
Flow:
- The end user initiates a payment on your site.
- Your backend creates a Bitcoin top-up request by calling the ElenPAY API.
- ElenPAY returns the top-up details, including a Bitcoin
address. - You display the address (QR code or string) to the user for payment.
- The user pays to the provided Bitcoin address using their wallet.
- ElenPAY monitors the address and notifies you of the payment is processed and settled.
Sequence Diagram:
sequenceDiagram
  EndUser->>Merchant: Initiate payment
  Merchant->>ElenPAY: Create Bitcoin top-up request
  ElenPAY-->>Merchant: Return top-up details (with address)
  Merchant->>EndUser: Show address (QR or string)
  EndUser-->>ElenPAY: Pay to Bitcoin address
  ElenPAY->>Merchant: Webhook notification (processing, settled)
Creating a Bitcoin Top-Up
Endpoint: PUT /api/v1/stores/{storeId}/onchain/btc/addresses/{customerId}
Note: This endpoint is used to fetch a Bitcoin address for on-chain deposits. The address is generated (or reused) for the given customer and store. The address is monitored for payment, and webhooks are sent to notify you of status changes. This is not a Lightning invoice, it's a Bitcoin address for top-up.
Description: Fetches a Bitcoin address for an on-chain top-up. Use this to request payment from a user via Bitcoin address (either through the widget or directly). The same address will be returned for the same customerId and storeId combination.
Required path parameters:
storeId: Your store's unique identifiercustomerId: Unique customer identifier for your system
Example CURL:
export STORE_ID="XXXXXXXXXXXXXX"
export CUSTOMER_ID="XXXXXXXXXXX"
export API_TOKEN="XXXXXXXXXXXXX"
export URL="https://api-staging.elenpay.tech"
curl -X PUT "${URL}/api/v1/stores/${STORE_ID}/onchain/btc/addresses/${CUSTOMER_ID}" \
  -H "accept: application/json" \
  -H "Content-Type: application/json" \
  -H "Authorization: Token ${API_TOKEN}" \
  -d '{
      "checkout": {
        "redirectURL": "google.com",
        "redirectAutomatically": false
    }
  }'
Response:
- The response contains:
id: Internal representation of the addressaddress: The Bitcoin address for making depositscheckoutLink: The link to the checkout page, where you can redirect the customer (shows address and QR)
Redirecting to your website
When initiating a deposit, you can configure the redirectURL and redirectAutomatically fields. This will allow the widget to redirect to your website after a deposit is completed:
checkout.redirectURL: Specifies the URL where the customer will be redirected after payment completion. Make sure your url starts withhttps://checkout.redirectAutomatically: If set totrue, the widget will automatically redirect the customer to theredirectURLafter payment completion. Otherwise, we will expose a button that the user can click for going back to your website.
Payment Links
Payment links allow you to direct users to complete payments using either the ElenPAY widget or a direct Bitcoin address. Below are the two options:
1. Checkout Link (Widget)
Use the checkoutLink field from the top-up creation response to direct users to the ElenPAY widget. This widget provides a seamless payment experience.
Example:
https://<ElenPAY_domain>/o/<topUpId>
2. Bitcoin Address (No Widget)
If you want to use your own widget or make the user pay from your own website, retrieve the Bitcoin address using the payment methods endpoint. The address field in the response contains the Bitcoin address, which you can display as a QR code or a clickable link for wallets.
Endpoint: PUT /api/v1/stores/{storeId}/onchain/btc/addresses/{customerId}
Example:
bc1q...
Lightning Withdrawals
With Widget
A Lightning withdrawal can be processed using the ElenPAY withdrawal widget, allowing the user to choose how to receive their funds via Lightning Network.
Endpoint: POST /api/v1/stores/{storeId}/withdrawal/request
Description: Initiates a withdrawal and returns a checkoutLink for the user to complete the process via the widget.
Flow:
- You request a withdrawal by calling the endpoint above.
- ElenPAY returns a
checkoutLinkfor the withdrawal. - You present the checkout link to the user, which opens the ElenPAY withdrawal widget.
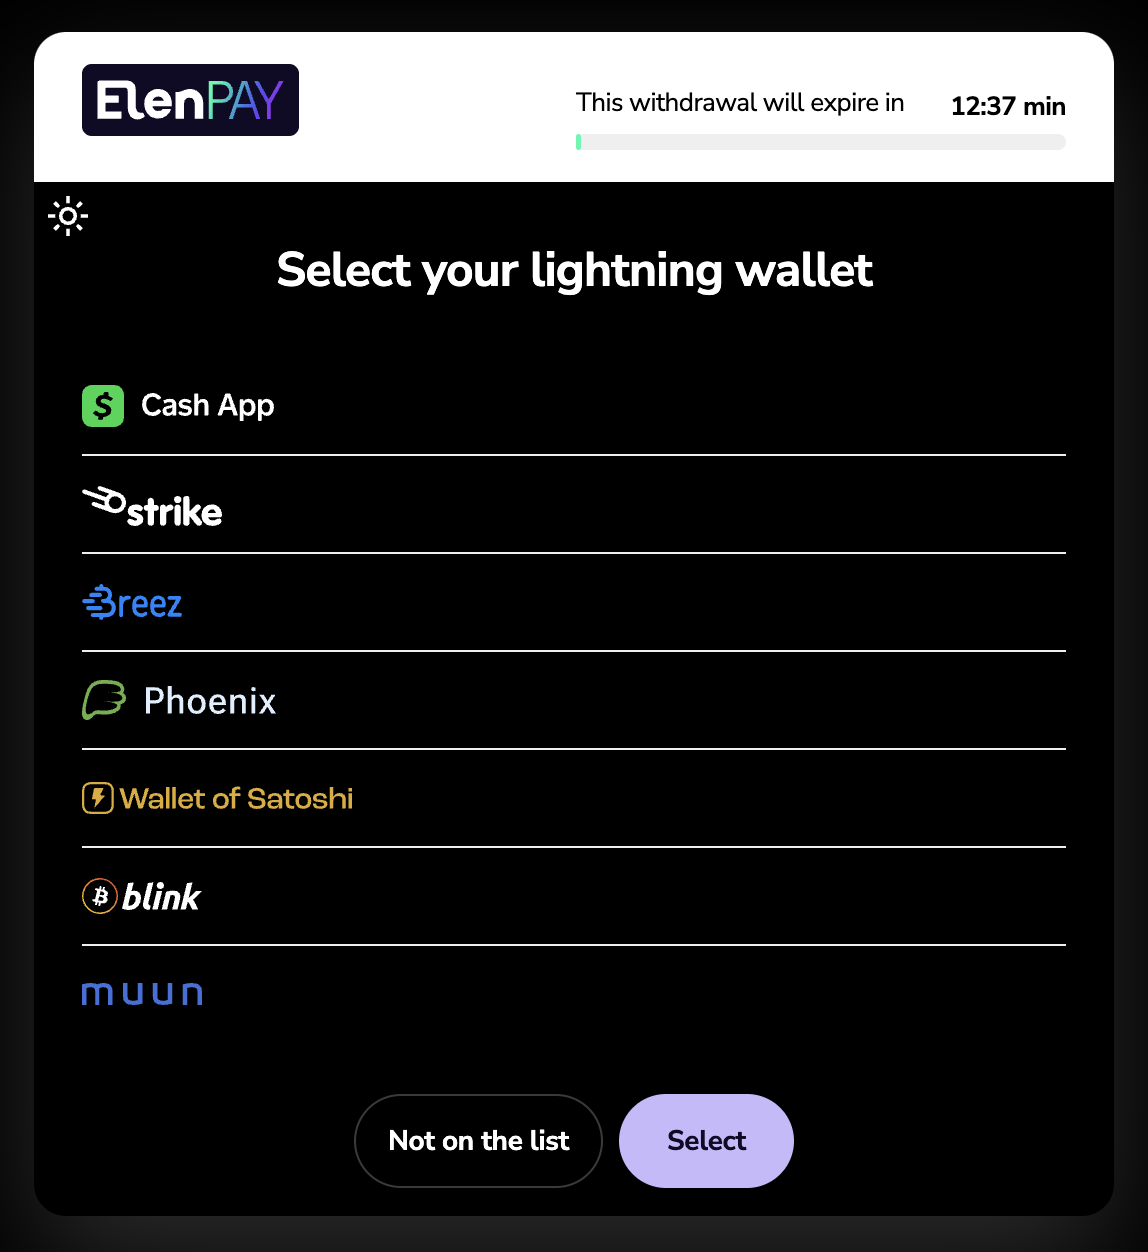
- The user chooses how to receive the funds (e.g., by providing a Lightning invoice or using LNURL) through the widget.
- ElenPAY processes the withdrawal and notifies you via webhook.
Sequence Diagram:
sequenceDiagram
Merchant->>ElenPAY: Request withdrawal
ElenPAY-->>Merchant: Return withdrawal details (with checkoutLink)
Merchant->>EndUser: Show withdrawal widget
EndUser-->>ElenPAY: Choose payout method (e.g., Lightning invoice, LNURL)
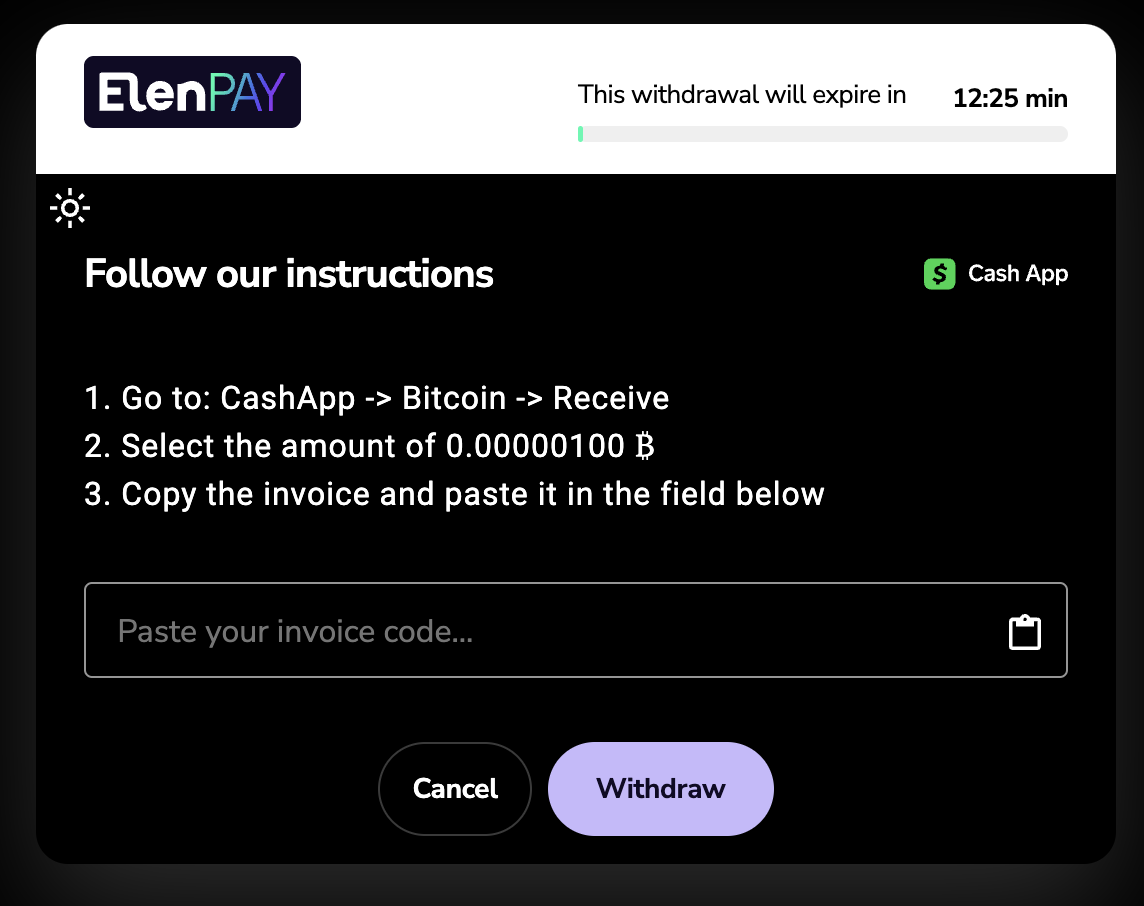
ElenPAY->>Merchant: Webhook notification (settled, cancelled)Widget Screenshots:
-
Type Selection:
-
LNURL Option:
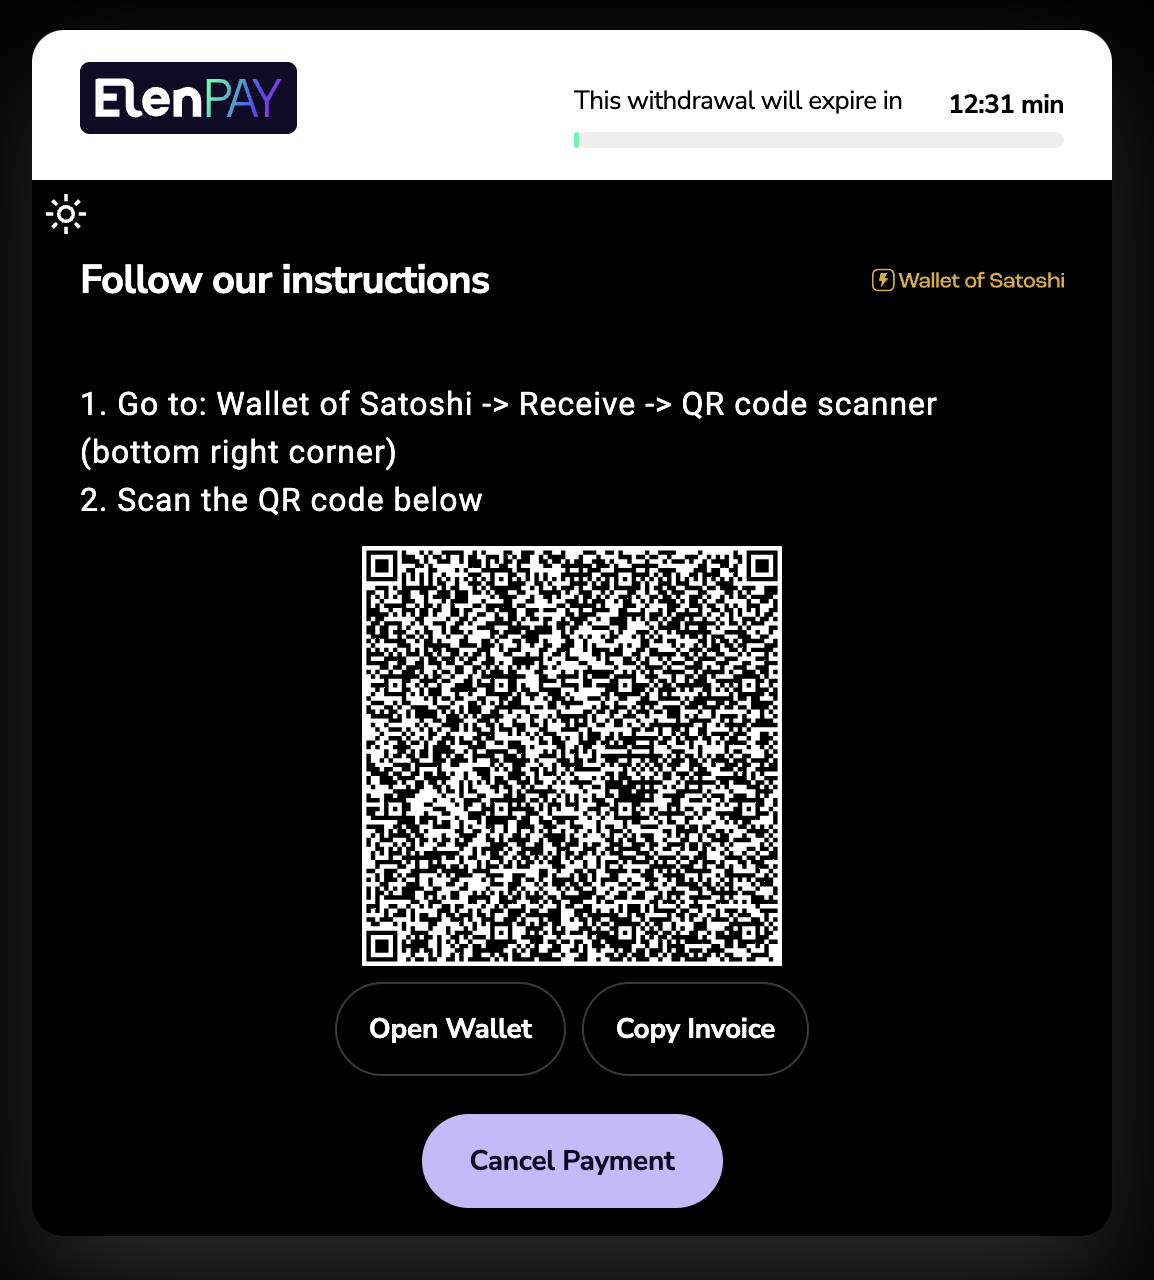
-
Invoice Option:
Redirecting to your website
When initiating a withdrawal, you can configure the redirectURL and redirectAutomatically fields. This will allow the widget to redirect to your website after a withdrawal is completed:
checkout.redirectURL: Specifies the URL where the customer will be redirected after withdrawal completion. Make sure your url starts withhttps://checkout.redirectAutomatically: If set totrue, the widget will automatically redirect the customer to theredirectURLafter withdrawal completion. Otherwise, we will expose a button that the user can click for going back to your website.
Without Widget
Lightning withdrawals can also be processed directly, by providing the payout details up front (e.g., a Lightning invoice).
Flow:
- You request a withdrawal by calling the appropriate endpoint for the withdrawal type (see below).
- ElenPAY processes the withdrawal asynchronously and pays the user directly via Lightning Network.
- You receive webhook notifications about the withdrawal status (settled or cancelled).
Sequence Diagram:
sequenceDiagram
  Merchant->>ElenPAY: Request withdrawal (with payout details)
  ElenPAY-->>Merchant: Return withdrawal details
  ElenPAY->>EndUser: Pay user directly (e.g., Lightning invoice, LNURL)
  ElenPAY->>Merchant: Webhook notification (settled, cancelled)
a) Withdraw to a Lightning Invoice
Endpoint: POST /api/v1/stores/{storeId}/invoice-withdrawal
Description: Pays the given amount to a provided Bolt11 invoice. Payment is processed asynchronously and retried if it fails. To withdraw directly to a Lightning invoice, include the paymentRequest field in your request.
Required fields:
amount: Amount to withdraw (up to 8 decimals for BTC)currency: Must beBTC.metadata: JSON object with required fields (see Metadata Field section for details):OrderId(optional): Unique order identifier for your systemCustomerId(optional): Unique customer identifier for your systemMerchantId(optional): Your merchant identifier if you use multiple merchant accountspaymentRequest: The Bolt11 invoice to pay
Example CURL:
export STORE_ID="XXXXXXXXXXXXXX"
export API_TOKEN="XXXXXXXXXXXXX"
export URL="https://api-staging.elenpay.tech"
curl -X POST "${URL}/api/v1/stores/${STORE_ID}/invoice-withdrawal" \
  -H "accept: application/json" \
  -H "Content-Type: application/json" \
  -H "Authorization: Token ${API_TOKEN}" \
  -d '{
    "amount": "0.001",
    "currency": "BTC",
    "metadata": {
      "OrderId": "12345678",
      "CustomerId": "401329b6-dd4e-4b4e-a866-730d4bc116c4"
    },
    "paymentRequest": "lnbc1..."
  }'
b) Withdraw via LNURL
Endpoint: POST /api/v1/stores/{storeId}/withdrawal/request
Description: Initiates a withdrawal and returns a link (LNURL) for the user to complete the process via their wallet.
Required fields:
amount: Amount to withdraw. Use two decimals for fiat, eight for BTC (e.g.,5.00for USD,0.00100000for BTC).currency: Must beBTCorUSDas fiat. Fiat rates are always based on BTC.metadata: JSON object with required fields (see Metadata Field section for details):OrderId(optional): Unique order identifier for your systemCustomerId(optional): Unique customer identifier for your systemMerchantId(optional): Your merchant identifier if you use multiple merchant accounts
Example CURL:
export STORE_ID="XXXXXXXXXXXXXX"
export API_TOKEN="XXXXXXXXXXXXX"
export URL="https://api-staging.elenpay.tech"
curl -X POST "${URL}/api/v1/stores/${STORE_ID}/withdrawal/request" \
  -H "accept: application/json" \
  -H "Content-Type: application/json" \
  -H "Authorization: Token ${API_TOKEN}" \
  -d '{
    "amount": "0.001",
    "currency": "BTC",
    "metadata": {
      "OrderId": "12345678",
      "CustomerId": "401329b6-dd4e-4b4e-a866-730d4bc116c4"
    }
  }'
How to use the LNURL:
- You will receive a
linkfield in the response, which is an LNURL (bech32-encoded URL). - Display this LNURL to the user as a QR code or provide it as a string for them to paste into their Lightning wallet.
- The user scans the QR code or pastes the LNURL in their wallet. Their wallet will then negotiate the withdrawal details directly with our backend.
- Once the user completes the withdrawal in their wallet, we will process the payment and notify you via webhook when it is settled or cancelled.
Note: For security reasons, a LNURL link can be used once. If at any point the process fails, the merchant must request a different LNURL from ElenPAY
On-chain (L1) Withdrawals
On-chain withdrawals send Bitcoin directly to any Bitcoin address using the main Bitcoin blockchain.
Withdraw to Bitcoin Address
Flow:
- You request an on-chain withdrawal by providing the Bitcoin address and amount.
- ElenPAY creates and sends the Bitcoin transaction.
- The transaction appears in the Bitcoin mempool and begins confirmation process. You will receive a webhook for every confirmation from confirmation 0 (appearing in the mempool) until the 6th confirmation when the transaction is marked as confirmed.
- You receive webhook notifications when the transaction is confirmed.
Sequence Diagram:
sequenceDiagram
  Merchant->>ElenPAY: Request on-chain withdrawal (with address and amount)
  ElenPAY-->>Merchant: Return withdrawal details (pullPaymentId)
  ElenPAY->>EndUser: Send Bitcoin to address
  ElenPAY->>Merchant: Webhook notification (confirmations, settled)
Endpoint: POST /api/v1/stores/{storeId}/onchain-withdrawal
Description: Sends Bitcoin directly to a specified Bitcoin address on-chain. This withdrawal is processed asynchronously.
Required fields:
amount: Amount to withdraw in BTC (up to 8 decimals, e.g.,0.00100000).address: The Bitcoin address where the funds will be sentmetadata: JSON object with required fields (see Metadata Field section for details):OrderId(optional): Unique order identifier for your systemCustomerId(optional): Unique customer identifier for your systemMerchantId(optional): Your merchant identifier if you use multiple merchant accounts
Example CURL:
export STORE_ID="XXXXXXXXXXXXXX"
export API_TOKEN="XXXXXXXXXXXXX"
export URL="https://api-staging.elenpay.tech"
curl -X POST "${URL}/api/v1/stores/${STORE_ID}/onchain-withdrawal" \
  -H "accept: application/json" \
  -H "Content-Type: application/json" \
  -H "Authorization: Token ${API_TOKEN}" \
  -d '{
    "amount": 0.001,
    "address": "bc1qxy2kgdygjrsqtzq2n0yrf2493p83kkfjhx0wlh",
    "metadata": {
      "OrderId": "12345678",
      "CustomerId": "401329b6-dd4e-4b4e-a866-730d4bc116c4"
    }
  }'
Response:
The response includes a pullPaymentId for tracking the withdrawal status. You will receive webhook notifications when the transaction appears in the mempool, when blocks are mined and when the transaction is confirmed.
Note: On-chain withdrawals incur Bitcoin network fees and may take longer to confirm compared to Lightning Network withdrawals. The transaction will be processed asynchronously, and you'll be notified via webhook when the blocks are mined and when the transaction it's settled.
Withdrawal Retry Policy
If a withdrawal (pull payment) fails due to network, routing, or liquidity issues, our system will automatically retry the withdrawal multiple times over a period of time. You do not need to manually retry failed withdrawals; the system handles retries for you.
If all attempts fail, the withdrawal will be marked as cancelled and you will receive a PullPaymentCancelled webhook event. After this webhook is received, it is safe to ask for another withdrawal for the same order.
Webhooks
Webhooks notify you about important events:
InvoiceSettled: Lightning Payment has been received.InvoiceExpired: Lightning Invoice has expired.PullPaymentSettled: Lightning Withdrawal was paid to the end user.PullPaymentCancelled: Lightning Withdrawal marked as cancelled after many payment attempts.OnchainDepositProcessing: Onchain (L1) deposit is detected in the mempool or is in the process of confirming.OnchainDepositSettled: Onchain (L1) deposit satisfies the confirmation threshold and is considered settled.
Webhook Security
Webhooks are a critical integration point and must be handled securely to prevent spoofing or unauthorized actions. Follow these best practices:
1. Signature Verification
- Every webhook request from ElenPAY includes a
BTCPay-Sigheader. - This header contains a HMAC SHA256 signature of the raw request body, using your webhook secret as the key.
- Always verify this signature before processing the webhook. If the signature does not match, reject the request (e.g., respond with HTTP 401 Unauthorized).
2. Webhook Secret
- Your webhook secret is provided by our ops team during store setup.
- Store this secret securely and never expose it publicly or in client-side code.
- If you believe your secret has been compromised, contact support immediately to rotate it.
3. Secure Endpoint
- Your webhook endpoint must be accessible from the public internet.
- Use HTTPS to encrypt traffic and prevent interception or tampering.
- Do not expose sensitive business logic or data at the webhook endpoint.
4. Idempotency and Replay Protection
- Webhooks will be retried if your server returns an HTTP status code of 400 or higher.
- Ensure your webhook handler is idempotent (processing the same event multiple times has no adverse effect).
- Use unique event IDs (e.g.,
deliveryIdin the payload) to detect and ignore duplicate events.
5. Logging and Monitoring
- Log webhook deliveries and verification failures for auditing and troubleshooting.
- Monitor for unexpected or failed webhook attempts.
6. Example: Signature Verification
See examples.md for a C# code sample. You can implement similar logic in any backend language.
Example webhook payloads and more details: See Webhook Types below.
7. Metadata in Webhooks
For the merchant's convenience, every webhook includes the metadata provided during the initiation of the transaction. This allows you to easily match webhook events to your internal records, such as orders or customer details. See the Metadata Field section for detailed information about metadata structure and requirements.
See the Webhook Types section for example payloads and field descriptions.
Best Practices
- Always store invoice and pull payment IDs for future reference.
- Validate webhook signatures to prevent spoofing.
- Handle API errors and rate limits gracefully (implement retries with backoff).
- Keep your API keys and webhook secrets secure.
Webhook Types
| Event Name | Description |
|---|---|
InvoiceExpired |
Invoice (L2 deposit) has expired |
InvoiceSettled |
Invoice (L2 deposit) has been settled |
PullPaymentSettled |
Pull payment (L2 withdrawal) has been settled |
PullPaymentCancelled |
Pull payment (L2 withdrawal) has been cancelled (e.g., Lightning errors, node offline, retry time exhausted) |
OnchainDepositProcessing |
Onchain (L1) deposit is being processed (in mempool, awaiting confirmations) |
OnchainDepositSettled |
Onchain (L1) deposit has been settled (confirmed) |
OnchainWithdrawalProcessing |
Onchain (L1) withdrawal is being processed (in mempool, awaiting confirmations) |
OnchainWithdrawalSettled |
Onchain (L1) withdrawal has been settled (confirmed) |
Example: Deposit Webhook
{
  "manuallyMarked": false,
  "currency": "BTC",
  "cryptoAmount": 0.001,
  "fiatAmount": 350.00,
  "deliveryId": "KcaTiTbW3wizMoRy4LY2qY",
  "webhookId": "Ery8f2rjP3iLzbF2pVqkuF",
  "originalDeliveryId": "CPbfRrDc6RDUigbim8V4fd",
  "isRedelivery": false,
  "type": "InvoiceSettled",
  "timestamp": 1717000000,
  "storeId": "5GtvTUFXtJGrqGV5kqMbadtKr4aL2Z63Muk2rAQkYzyT",
  "invoiceId": "3J2zjjKBkY3Bt2yDk91mHy",
  "metadata": {
    "OrderId": "12345678",
    "CustomerId": "401329b6-dd4e-4b4e-a866-730d4bc116c4"
  }
}
Example: Withdrawal Webhook
{
  "currency": "BTC",
  "cryptoAmount": 0.001,
  "fiatAmount": 350.00,
  "deliveryId": "Cs49yfQw5mWAJu1ZrYzQDj",
  "webhookId": "S6Y7qomhBe4yCKATRFm1nN",
  "originalDeliveryId": "A1DMdwVYMKf6DWgm1X9YEU",
  "isRedelivery": false,
  "type": "PullPaymentSettled",
  "timestamp": 1717000000,
  "storeId": "5GtvTUFXtJGrqGV5kqMbadtKr4aL2Z63Muk2rAQkYzyT",
  "pullPaymentId": "6HUy85LvPuHCY6Gvpn8ZRP",
  "invoiceId": null,
  "reason": null,
  "metadata": {
    "OrderId": "12345678",
    "CustomerId": "401329b6-dd4e-4b4e-a866-730d4bc116c4"
  }
}
Example: Onchain Deposit Processing Webhook
{
  "deliveryId": "3RL3NPLRBDZwCbFKXsV5c1",
  "webhookId": "22G1KAqKa2eqwrwdUPffJu",
  "originalDeliveryId": "ErhPg4FAaXMc4st88Qz4mA",
  "isRedelivery": false,
  "type": "OnchainDepositProcessing",
  "timestamp": 1717000000,
  "pspReferenceId": "QC775LXHbRJ4wH2LAQzdnz",
  "storeId": "5GtvTUFXtJGrqGV5kqMbadtKr4aL2Z63Muk2rAQkYzyT",
  "currency": "BTC",
  "cryptoAmount": 0.0001,
  "fiatAmount": 10.00,
  "metadata": {
    "orderId": "12345678",
    "customerId": "31a68df4-3ed2-4b54-abd0-bdfb401a22a6"
  },
  "tx": {
    "hash": "fa859709ae305806d5b8d78c48195349c2f6161eeb1f02648e8db26a33f6ee0a",
    "address": "bc1qun9nne0rxhakttxv44tdq4rcs0muw5fzamez38",
    "sats": 1000,
    "confirmations": 0
  }
}
Example: Onchain Deposit Settled Webhook
{
  "deliveryId": "SZd4higXeHEe3WCvkbQUXW",
  "webhookId": "2544xujex68uTb5rDp2B31",
  "originalDeliveryId": "JSuoCwSBqhbojbDJH2BoTE",
  "isRedelivery": false,
  "type": "OnchainDepositSettled",
  "timestamp": 1717000000,
  "pspReferenceId": "QC775LXHbRJ4wH2LAQzdnz",
  "storeId": "5GtvTUFXtJGrqGV5kqMbadtKr4aL2Z63Muk2rAQkYzyT",
  "currency": "BTC",
  "cryptoAmount": 0.0002,
  "fiatAmount": 20.00,
  "metadata": {
    "orderId": "12345678",
    "customerId": "31a68df4-3ed2-4b54-abd0-bdfb401a22a6"
  },
  "tx": {
    "hash": "fa859709ae305806d5b8d78c48195349c2f6161eeb1f02648e8db26a33f6ee0a",
    "address": "bc1qun9nne0rxhakttxv44tdq4rcs0muw5fzamez38",
    "sats": 2000,
    "confirmations": 6
  }
}
Example: Onchain Withdrawal Processing Webhook
{
  "deliveryId": "3RL3NPLRBDZwCbFKXsV5c1",
  "webhookId": "22G1KAqKa2eqwrwdUPffJu",
  "originalDeliveryId": "ErhPg4FAaXMc4st88Qz4mA",
  "isRedelivery": false,
  "type": "OnchainWithdrawalProcessing",
  "timestamp": 1717000000,
  "pspReferenceId": "QC775LXHbRJ4wH2LAQzdnz",
  "storeId": "5GtvTUFXtJGrqGV5kqMbadtKr4aL2Z63Muk2rAQkYzyT",
  "currency": "BTC",
  "cryptoAmount": 0.0001,
  "fiatAmount": 10.00,
  "metadata": {
    "orderId": "12345678",
    "customerId": "31a68df4-3ed2-4b54-abd0-bdfb401a22a6"
  },
  "tx": {
    "hash": "fa859709ae305806d5b8d78c48195349c2f6161eeb1f02648e8db26a33f6ee0a",
    "address": "bc1qun9nne0rxhakttxv44tdq4rcs0muw5fzamez38",
    "sats": 10000,
    "confirmations": 0
  }
}
Example: Onchain Withdrawal Settled Webhook
{
  "deliveryId": "SZd4higXeHEe3WCvkbQUXW",
  "webhookId": "2544xujex68uTb5rDp2B31",
  "originalDeliveryId": "JSuoCwSBqhbojbDJH2BoTE",
  "isRedelivery": false,
  "type": "OnchainWithdrawalSettled",
  "timestamp": 1717000000,
  "pspReferenceId": "QC775LXHbRJ4wH2LAQzdnz",
  "storeId": "5GtvTUFXtJGrqGV5kqMbadtKr4aL2Z63Muk2rAQkYzyT",
  "currency": "BTC",
  "cryptoAmount": 0.0002,
  "fiatAmount": 20.00,
  "metadata": {
    "orderId": "12345678",
    "customerId": "31a68df4-3ed2-4b54-abd0-bdfb401a22a6"
  },
  "tx": {
    "hash": "fa859709ae305806d5b8d78c48195349c2f6161eeb1f02648e8db26a33f6ee0a",
    "address": "bc1qun9nne0rxhakttxv44tdq4rcs0muw5fzamez38",
    "sats": 10000,
    "confirmations": 6
  }
}
Troubleshooting
- If you miss a webhook, you can poll the invoice or withdrawal status via the API or redeliver it from the ElenPAY backoffice.
- Webhooks are retried automatically if your server is temporarily unavailable.
- For any questions, contact our support team.
For additional questions, see our FAQ.
This guide is designed to be clear and actionable. If you have suggestions or need more examples, let us know!